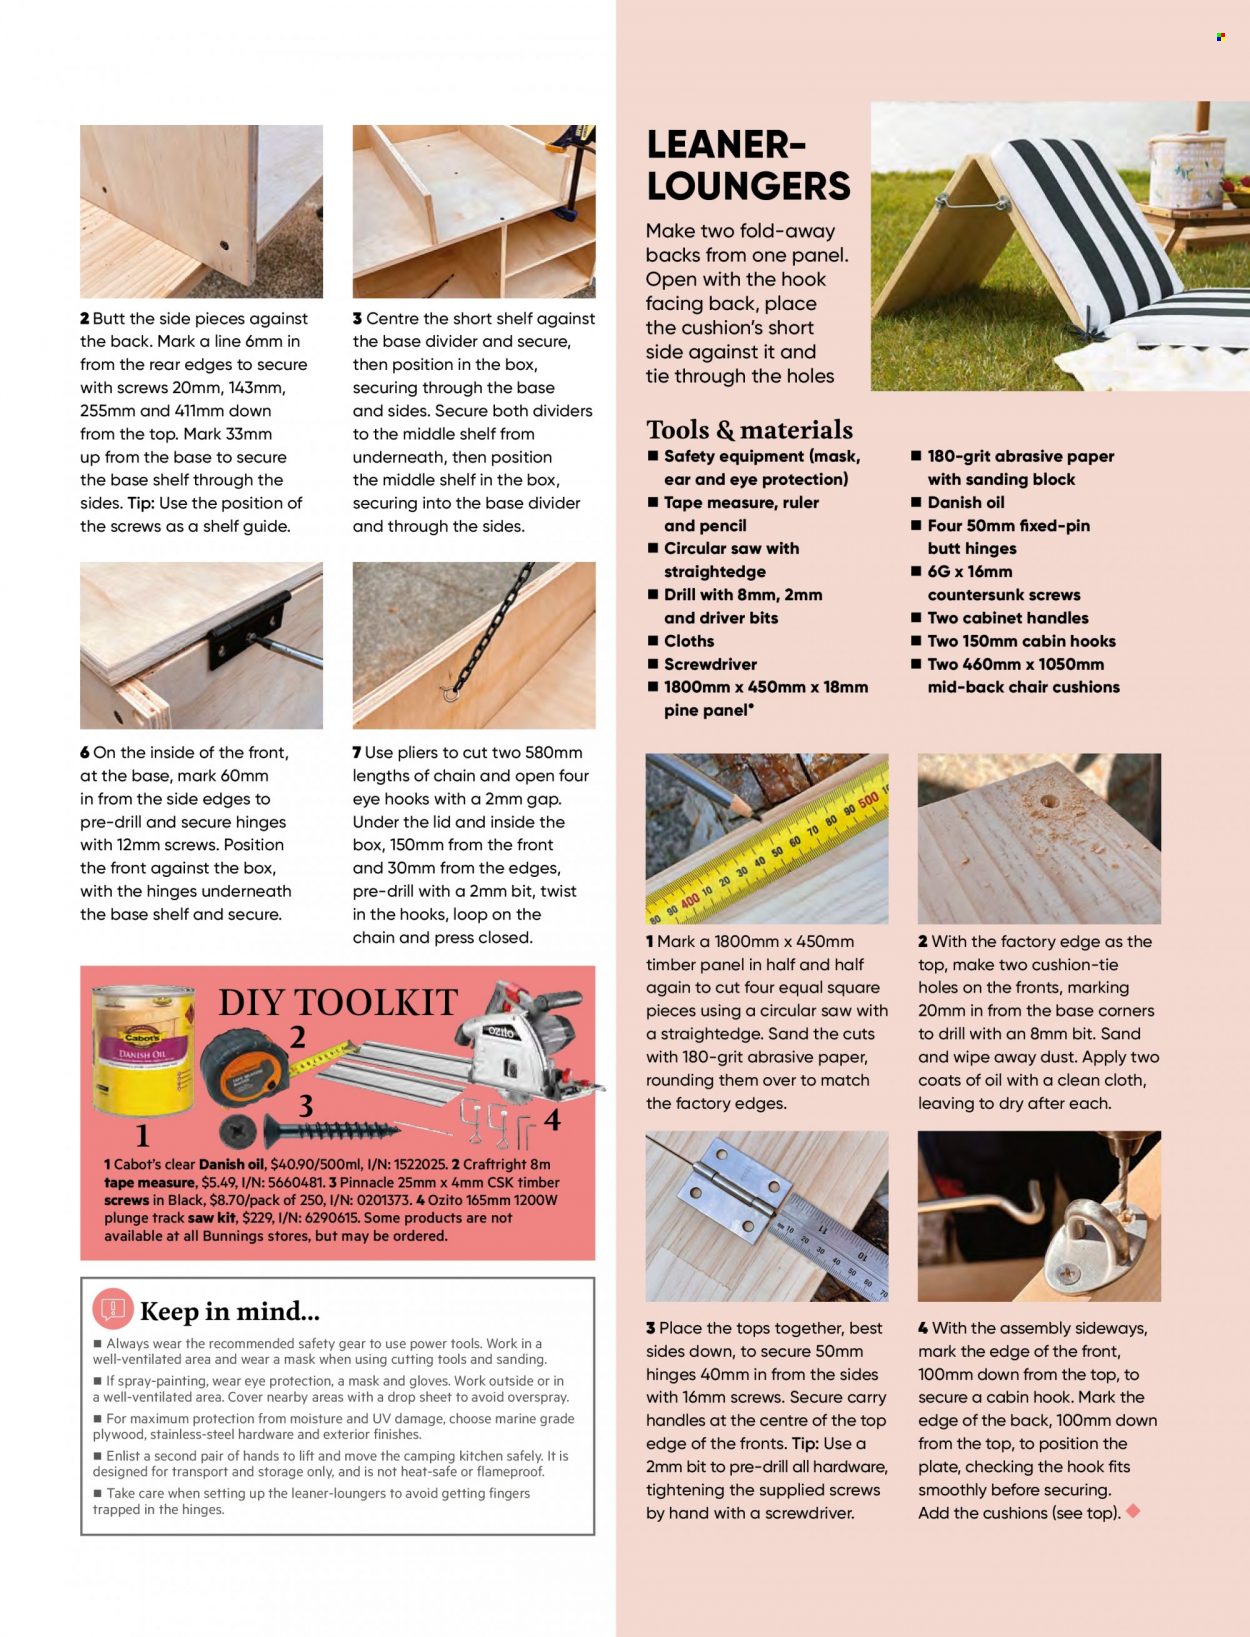
LEANERLOUNGERS
2 Butt the side pieces against
the back. Mark a line 6mm in
from the rear edges to secure
with screws 20mm, 143mm,
255mm and 411mm down
from the top. Mark 33mm
up from the base to secure
the base shelf through the
sides. Tip: Use the position of
the screws as a shelf guide.
3 Centre the short shelf against
the base divider and secure,
then position in the box,
securing through the base
and sides. Secure both dividers
to the middle shelf from
underneath, then position
the middle shelf in the box,
securing into the base divider
and through the sides.
6 On the inside of the front,
at the base, mark 60mm
in from the side edges to
pre-drill and secure hinges
with 12mm screws. Position
the front against the box,
with the hinges underneath
the base shelf and secure.
7 Use pliers to cut two 580mm
lengths of chain and open four
eye hooks with a 2mm gap.
Under the lid and inside the
box, 150mm from the front
and 30mm from the edges,
pre-drill with a 2mm bit, twist
in the hooks, loop on the
chain and press closed.
DIY TOOLKIT
2
1
3
4
Make two fold-away
backs from one panel.
Open with the hook
facing back, place
the cushion’s short
side against it and
tie through the holes
Tools & materials
nS
� afety equipment (mask,
ear and eye protection)
n �Tape measure, ruler
and pencil
n �Circular saw with
straightedge
n �Drill with 8mm, 2mm
and driver bits
n �Cloths
n �Screwdriver
n �1800mm x 450mm x 18mm
pine panel•
n 1� 80-grit abrasive paper
with sanding block
n �Danish oil
n �Four 50mm fixed-pin
butt hinges
n �6G x 16mm
countersunk screws
n �Two cabinet handles
n �Two 150mm cabin hooks
n �Two 460mm x 1050mm
mid-back chair cushions
1 Mark a 1800mm x 450mm
timber panel in half and half
again to cut four equal square
pieces using a circular saw with
a straightedge. Sand the cuts
with 180-grit abrasive paper,
rounding them over to match
the factory edges.
2 With the factory edge as the
top, make two cushion-tie
holes on the fronts, marking
20mm in from the base corners
to drill with an 8mm bit. Sand
and wipe away dust. Apply two
coats of oil with a clean cloth,
leaving to dry after each.
3 Place the tops together, best
sides down, to secure 50mm
hinges 40mm in from the sides
with 16mm screws. Secure carry
handles at the centre of the top
edge of the fronts. Tip: Use a
2mm bit to pre-drill all hardware,
tightening the supplied screws
by hand with a screwdriver.
4 With the assembly sideways,
mark the edge of the front,
100mm down from the top, to
secure a cabin hook. Mark the
edge of the back, 100mm down
from the top, to position the
plate, checking the hook fits
smoothly before securing.
Add the cushions (see top).
1 Cabot’s clear Danish oil, $40.90/500ml, I/N: 1522025. 2 Craftright 8m
tape measure, $5.49, I/N: 5660481. 3 Pinnacle 25mm x 4mm CSK timber
screws in Black, $8.70/pack of 250, I/N: 0201373. 4 Ozito 165mm 1200W
plunge track saw kit, $229, I/N: 6290615. Some products are not
available at all Bunnings stores, but may be ordered.
Keep in mind…
Always wear the recommended safety gear to use power tools. Work in a
well-ventilated area and wear a mask when using cutting tools and sanding.
n If spray-painting, wear eye protection, a mask and gloves. Work outside or in
a well-ventilated area. Cover nearby areas with a drop sheet to avoid overspray.
n For maximum protection from moisture and UV damage, choose marine grade
plywood, stainless-steel hardware and exterior finishes.
n Enlist a second pair of hands to lift and move the camping kitchen safely. It is
designed for transport and storage only, and is not heat-safe or flameproof.
n Take care when setting up the leaner-loungers to avoid getting fingers
trapped in the hinges.
n